Tags

✿ Pokemon Tag ✿

Hello, guys and gals!

Today I thought I’d write up a quick little Pokemon tag. I’ve been in more of a video game mood than usual, which can perhaps be attributed to the stress of my new 9-5 job. 😛 While eagerly awaiting more news on Pokemon Sun and Moon and Pokemon Go I’ve been replaying Platinum– and catching up on the XY and XYZ series. I’m honestly charmed! Serena is actually a delightful heroine (which is refreshing after the spate of irritating and one-sided sidekicks we’ve been inundated with over the past several years). The Pokemon contest episodes, and Serena’s character arc in general, ended up being one of my favorite parts of the series.

Favorite Pokemon

My taste in Pokemon was once wide and varied. Alas, no more– a specific Pokemon type has stolen my heart! The first one listed is not that type, but its appearance should give you a hint. 😉

Audino

250px-531Audino.png

600px-531Audino-Mega

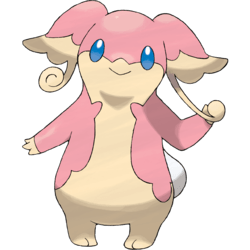
Audino is just so CUTE. I’m an absolute sucker for the pink-and-cream color scheme, and the frilly ears and tiny hands and feet completely sold it for me. I’m not terribly fond of its mega evolution (is that a bizarre mask-jacket combination??) but it’s impossible for me to refuse pastel colors, and the wing-ears and scalloped edges inspire delightful nostalgia for my Cardcaptor Sakura and CLAMP days.

(Side note: I always thought it was pronounced “aud-ee-no”, but apparently it’s “aud-ih-no”!)

Espurr

250px-677Espurr.png

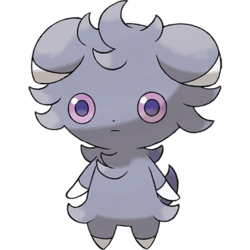
Frankly, I found Espurr super creepy at first. It reminded me of a grey Kyubey.

Want to sign a contract?

But it was so sad and adorable in the anime that I changed my mind completely! It is now one of my favorites.

Klefki

250px-707Klefki.png

Klefki is one of those strange Pokemon that looks like something out of a lucid dream and was likely the result of a desperate need to fill new Pokemon quotas. I never got a chance to be truly skeptical, however, as I was introduced to Klefki in the short film “Pikachu, What’s This Key?” in which it was super cute and I fell in love.

The official Pokedex entry says “Klefki loves to collect keys and will confront opponents with a fierce jingle of their collection.”

Swoon.

So cute.

Skitty

250px-300Skitty.png

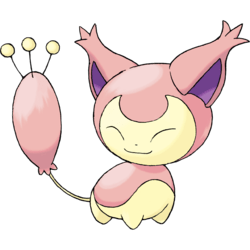
One of my first memories of Pokemon was in elementary school, where I played with my best friend’s Skitty figurine. Even though I was too cool for pink (an opinion which has clearly undergone a 180º shift over the last decade) we used it in all of our make-believe games, so I was psyched when I saw it in the anime for the first time! (We watched it on VHS tape. I feel positively archaic.)

That nostalgia, however, is why Skitty is firmly situated among its (mostly pink) cohorts on my dream team.

Slurpuff

250px-685Slurpuff.png

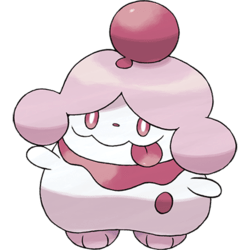
Slurpuff is a Pokemon that I felt an instant connection to. Not only is it the Meringue Pokemon– who doesn’t love sugary pastel confections?– it pretty much exclusively subsists upon sweets. And it’s pink! Despite its slightly questionable, clown-like look, I appreciate its overall aesthetic and character enough that were it real I would probably cuddle it forever.

Sylveon

250px-700Sylveon.png

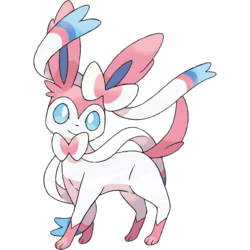
It should come as no surprise that Sylveon occupies the final spot on my ideal team. It’s super cute, sports an adorable pastel pink/blue/white color scheme, and comes with flesh ribbons that caress its trainers arm as they walk together. What a perfect blend of sweet and utterly terrifying!

Favorite Gym Leader

300px-XY_Valerie.png

If I could be any fictional character in any universe, I would be Valerie! Not only does she have a strong aesthetic sense, something I also value and try to incorporate into every aspect of my life, but Gym Freaks “also states that she used to be a model and as such can wear incredibly high heels.” Anyone who has encountered me in real life knows that I am a huge fan of heels, and despite being of Amazonian stature don three to four inch heels on a daily basis. Valerie is also a fashion designer who makes lovely, Pokemon-inspired designs, which is obviously super appealing to me!

Favorite City

maxresdefault

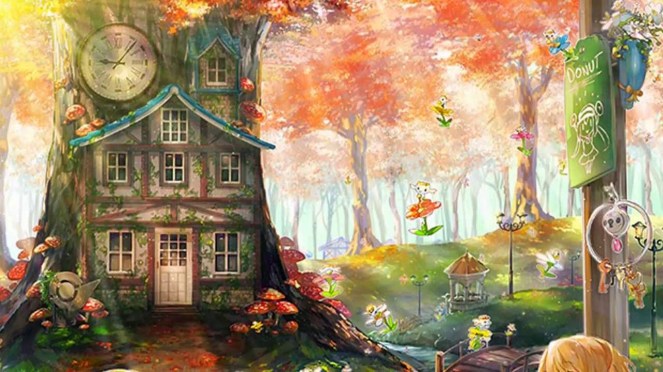
I doubt anyone is surprised that my answer is Laverre City. My predilection for Fairy types is fairly obvious at this point, but I also love all things quaint and charming, and Fairy Central certainly fits the bill! I love enchanted English cottages and whimsical fairylands, and Laverre is the perfect marriage of both. Q v Q

That’s all from me! If anyone would like to do this tag, they are more than welcome– I’d love to see your favorite Pokemon and cities.

Happy sewing!

Lady Licorice


Historical · The Making Of

✂ Making Victorian Dragonair: Part 3 – The Skirt & Bertha ✂

Apologies for the long wait– but we’ve finally reached the last post on this costume! If you haven’t already, I suggest checking out part one and part two.

Last time the bodice was left with an unfinished neckline, but I was completely tired of hand sewing and detail work at that point so I switched to working on the skirt.

Caution: Some of the following photos feature the most terrible lighting in the history of ever, since I was working late at night! :’>

IMG_5153

IMG_5155

I was in quite a hurry at this point, since the NorCal gathering was fast approaching, so the process of making this skirt was a bit… organic. I was able to utilize the width of this fabric, since it was 120″ wide, so I just cut straight across to form several large rectangles. Two of them was pleated for the front and back, and the rest were subsequently cut diagonally across to form wedge shapes– these were my gores, which are very important for achieving the fashionable thrown back 1860s silhouette! The straight edges are stitched to the front panel of the skirt and the long diagonal edge to the back panels.

IMG_5156

I roughly pinned everything together and pleated it onto my dress form. I really liked the way it was taking shape, so I didn’t bother to think about things like hemming (!!!). Or finishing interior seams, though I did try to utilize the selvedge.

IMG_5157

IMG_5164

I stitched the skirt together, then finished the opening (which was on the right side) by turning the edges over twice and stitching them down. I backstitched across the point several times to keep everything nice and secure!

IMG_5177

IMG_5179

I cartridge pleated the skirt with two even rows of running stitches. Using waxed upholstery thread and working in sections is definitely the key to successful cartridge pleating– and even then I had issues with tangling! It’s definitely not my favorite thing to do, but I did manage to get the entire width pleated onto the waistband.

IMG_5181

This is the WORST photo. I’m sorry for subjecting your eyes to it. However, you can see how terrible the hem looked with all the uneven, trailing pieces. I cut those off and stitched a quick, messy hem. It was pretty awful, actually, and was even worse once I tried it on! Surprise, surprise, garments sit differently on my mannequin than they do on me. Fortunately, my skirt is long enough that it isn’t too visible in photographs.

Next, I switched to working on the bertha. These are large, lacy, pleated collars almost always seen on ballgowns from this period! I had no idea what I was doing, so I just tried to figure it out as I went along.

IMG_4774

I started by tracing the neckline of my bodice onto lightly interfaced quilting cotton, and cutting it into a shape I liked. I did the same with the back, but drafted it as two pieces so it could hook closed.

IMG_4782

Rather than pleating a single piece of fabric to shape, I made bias tape out of a lovely white silk-cotton blend and stitched the layered strips on top of each other. This ended up being an extended and labor-intensive process, and one that I do not recommend at all!

IMG_4792

I chose not to continue the pleating on the back, as I was running out of time, patience, and bias strips, so I covered each side with a layer of silk and finished the edges with leftover tape.

IMG_4799

To cover up the ugly bits where the bias “pleats” met, I used a doubled strip of my dress fabric and folded all the edges in for a tidy finish.


IMG_4807

I subsequently switched gears and started working on the decorative puffed trim. This is the simplest trim in the world to make, but looks absolutely lovely! You just need to double hem a 2.5″ strip of fabric and gather it every inch and a half or so. Keep in mind that altering the proportions and density of puffs will yield a variety of interesting looks!

IMG_4818

IMG_4846

Once the puffed trim was all stitched on, I added a border of delicate venise lace and stitched hooks and eyes to the back as a closure. The front is tacked to the bodice, but the back needed to remain free so I could lace the back of my bodice underneath it!

IMG_4820

I loved the way it looked at this stage, but it lacked a lot of the frilliness that I wanted. Accordingly, I decided to add beads and giant bows (because who can possibly object to either??)

IMG_4830

I chose a simple repeating pattern of large and small pearls to hide the stitches on the puffed trim. It was unexpectedly quite pretty!

IMG_4936

IMG_4943

Giant, obnoxious bows provided the perfect finishing touch!

After that, it was off to the NorCal gathering. It was 98 degrees in the shade, so we only managed to stay for about 30 minutes!

IMG_5189
The orange bodice and skirt base were also made by me.

We just wore our chemises and corsets in the car, both for coolness and convenience, and had to dress hastily in the parking lot. This was a source of great amusement for several passers-by and their children!

IMG_5190

IMG_5187

This delightful Belle made our day! You can tell how dreadfully hot it was by the hazy glow in these photos.IMG_5194

11863293_616895505120084_1764266825184296600_n
PC: Subversive Photography

While we weren’t able to stay for very long, the gathering was a lovely debut for these costumes! They needed a lot of work, however, to be ready for the SacAnime Summer 2015 masquerade.

I started with the hem, since I had intended to add lace to it from the beginning and had simply run out of time.

IMG_5342

I had twelve yards of this beautiful, elaborate venise lace… and it was nowhere NEAR enough. So, with great sadness, I decided to fussy cut individual motifs out and space them with another lace that I had in my stash.

IMG_5348

IMG_5362

Stitching them all on proved to be extremely time-consuming, but I managed…

IMG_5379

Until it turned out that I hadn’t measured correctly, I had nowhere near enough of the large motifs, and there was a large gap that had to be filled in with the small ones.
Which was depressing, but I was in con crunch mode and had zero time to mope (or vacuum)!

The headdress was the final piece, finished the night before we left for the convention.

IMG_5392

I started with a silver headband base that I had purchased at the Dickens Fair several years prior and never worn, some fabric scraps, and some feathers.  I based the design on an extant photo of a period headdress with two large gathered ribbons on either side.


IMG_5394

I burned the edges of the ribbon rather than hemming them, folded them over until they were vaguely bow shaped, and stitched them down. Some trailing ribbon and lace scraps finished them off.

IMG_5400

IMG_5401

I glued feathers onto the back, then added loops so that the bows could slide onto the headband. The lace looked a little unfinished, however, which really bothered me! So I added some pearls in various sizes.

IMG_5396

Aaaand finished! Safely in time for the convention, too. I also managed to make a fur wrap and add the black netting to the skirt of the orange ensemble, so I considered it a very fruitful con crunch.

The masquerade itself was… interesting. I had fun, and met some wonderful people backstage, but there was a LOT of waiting involved, and schedules for check in/craftsmanship judging/the actual performance just kept getting pushed further back. The corsets were actually causing us back pain, so after the seven hours (!!!) of waiting, we finally just loosened them backstage. Ten minutes later, they called us on and it was a mad dash to tighten them again and lace our bodices back on. The last eyelet on mine was laced literally seconds before we walked onstage!

Besides being the thumbnail, we can be found at 4:31.

IMG_5426

It was all smiles backstage, although you can see my phone sneaking its way out of the pocket I added to my skirt!

IMG_5437
Futuristic eye makeup is always appropriate for mid-Victorian eveningwear.

And, in a very pleasant plot twist, we won Best Original despite being moved into the advanced category as novices! That was my second time ever competing, after debuting Lady Three at Fanime earlier that year, so to have received an award both times went a long way toward boosting my costuming confidence. It truly inspired me to extend myself as an artist and to improve my technical skill!

It is (hopefully) on to bigger and better things now. I’m currently attacking a Sakizo design, which I would like to post about soon (although I have quite the backlog of projects) as well as Valkyrie Leona from League of Legends and a ballet version of Sailor Pluto. If you would like to follow along with my progress, I am most active on my Instagram and am attempting to post more frequently on my Facebook. I am also a current competitor in the TranspArt contest held jointly by Worbla and Cosplay Supplies, so I will be posting updates on my project for that as well!

Happy sewing!
Lady Licorice

Historical · The Making Of

✂ Making Victorian Dragonair: Part 2 – The Bodice ✂

Here we go with part 2 of Victorian Dragonair! Fun fact: this wasn’t intended to be a cosplay in the beginning, simply a semi-accurate 1860s evening gown, but in order to enter the SacAnime Masquerade the costume needed to be based on Japanese pop culture. Accordingly, I chose Dragonair, a Pokemon with a similar color scheme, and added little touches (like the feather headdress and the pearls) to turn it into a proper gijinka.

IMG_4518

I draped the bodice quickly on my dress form (it took about 15 minutes, since it’s a simple 6-piece pattern with basic style lines) and turned that into a mockup. It fit almost perfectly– I just had to take it in at the waist and the back, and I had my pattern! The neck, arms, and waist have reduced seam allowance since they’re finished with piping.

IMG_4533

I shall digress for a moment to discuss my new shears, the Kai ones pictured above. My old shears were German steel and 10 years old, so they were a little rusty and a little stiff from the prolonged use but still in great condition. These Kai shears, however, totally outclass them. In fact, I even prefer them to my Ginghers! They’re a fraction of the price, but lightweight with incredibly ergonomic handles and razor sharp blades. They cut through the awful, tarp-like faux dupioni I was using for this gown like it was butter.

IMG_4544

In this dreadful, grainy photo, taken much too late at night in terrible lighting, you can see how perfectly the resulting garment fits over my corset. I’m very happy with this bodice, it’s probably my favorite part of the entire costume.

IMG_4550

All of the bodice pieces were flatlined with this pretty blue quilting cotton, and the seams were pressed open and the bones applied. I used some leftover twill tape as bone casing and stitched it into the bodice by hand, catching only the seam allowance.

IMG_4549

To finish the waist and armholes, I made my own piping. I cut 3″ bias strips from my fabric (following this fantastic tutorial) and enclosed a piece of Lion Homespun yarn in it, then used my zipper foot to stitch right alongside the yarn. I then machine stitched this onto the bodice, again using my zipper foot.

Don’t forget to clip your curves! Even though it’s cut on the bias, you still need to cut piping around extreme curves (like the center point on this bodice).

I know you’re supposed to use proper cord for piping, but Lion Homespun yarn is super bulky, so it looks really nice as piping, and I just happened to have quite a large quantity on hand.

IMG_4623

I subsequently used pinking shears to cut the loose ends of the piping (since this fabric is the devil and frays horrendously) and tacked it to the inside of the bodice using a herringbone stitch. I love the way it looks! I only caught the flatlining cotton in each stitch, so it’s invisible from the outside.

IMG_4586

Here’s how it looked pinned onto my dress form. I was super happy with it, so I finally forced myself to start on the scariest part– the eyelets.

IMG_4625

I had never done hand bound eyelets before, so I started by testing one on a scrap. I used two strands of waxed embroidery floss and a buttonhole stitch. This led to a very pretty result, but the fabric kept shifting and the finished eyelet was too small. To combat this I decided to whipstitch around each hole with normal thread  (a staystitch, if you will) before going back around with the buttonhole stitch.

IMG_4632

The top eyelet is done, and you can see the whipstitching on the bottom two. This preliminary stitching doesn’t have to be neat, it just has to keep the fibers tidy and out of the way.

IMG_4716

To do the buttonhole stitch, start by putting your needle into the hole as pictured above.

IMG_4717

Make your thread into a loop…

IMG_4721

… and pull it through like so.

IMG_4722

The buttonhole stitch forms a little knot, as you can see above. It’s your decision whether you want your knot to be positioned to the outside of your eyelet or the inside– I personally like the way it looks on the outside, even though it’s slightly less durable, so that’s what I went with.

IMG_4724

Here’s what it looks like with two stitches! Many people do eyelets with just layers of whip stitching, but I personally love the textured look of the buttonhole stitch, so I prefer it despite the extra effort it takes.

IMG_4731

And here are my finished eyelets (which took FOREVER and could certainly stand to be neater, but I’m very proud of them). They are staggered for spiral lacing, which Jen of Festive Attyre talks more about in this post.

IMG_4736

Here’s a closeup of the lacing! I happened to have this 50c ribbon in my stash, which was the perfect width for my eyelets and an appropriately complimentary color. I didn’t have any lacing tips so I tipped it in several layers of scotch tape rolled up tightly, and then went over it quickly with a lighter to melt the tape + fraying poly ribbon. It worked wonderfully as a quick solution!

IMG_4750

The finished bodice fits perfectly over my corset! The patterning gods were definitely smiling on me. Please note that I left the neckline unfinished because it was going to be covered by the bertha anyways and I’m lazy.

IMG_4748

Here’s a full shot of the back all laced up! Forgive the rumply chemise strap– since it was originally made as a Regency shift it did not want to cooperate with the low, wide neckline that was stylish in the 1860s.

And that’s it! I’ll be back next week with the last post, which will cover the skirt, the ruffly bertha, and the headdress.

Until then, happy sewing!

Lady Licorice